User Guide
QuickAttach makes managing record-linked documents effortless. Whether you are adding a vendor contract, an item picture, or a customer PO, you can do it without leaving the record page.
Using the Drag & Drop Zone
- Open any supported record (e.g., Customer Card, Item Card, or Sales Order).
- Locate the QuickAttach FactBox on the right-hand side of the page.
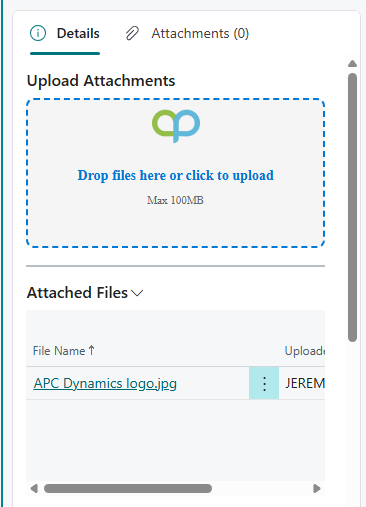
- Select one or more files from your computer and drag them directly into the "Drop Zone."
- The system will instantly validate the file and upload it.
- Note: If drag-and-drop is not supported by your browser, you can click the box to open a traditional file picker.
SharePoint Folder Organization
QuickAttach automatically organizes your files in SharePoint. You don't need to create folders manually; the system creates them using the following logic:
- Master Data:
QuickAttach/Customers/CUST001 - Documents:
QuickAttach/Sales/Order/SO1001/2025-11-24
Date format can be changed in the QuickAttach Setup.
Attachment Flow During Posting
- Attach a document (like a customer's signed quote) to a Sales Order.
- Post the Sales Order.
- Open the resulting Posted Sales Invoice. The attachment is automatically linked and visible there, ensuring a complete audit trail without re-uploading.
Limitations
- Credit Memos: Like standard BC, attachments added to Credit Memos do not "apply" to original invoices automatically; they remain linked to the Credit Memo record.