Setup and User Guide
Overview
This library app is used alongside Quick Attach. Learn more about the app here.
Installation & Setup
This app is licensed through Microsoft. To purchase and deploy it in your production environment, follow the instructions in the link below:
How to purchase and license the app through Microsoft AppSource
Create App Registration
- Log into your Microsoft Entra Admin Center(https://entra.microsoft.com/#home) with an Administrator account.
- On the left panel, under the Entra ID section, select App Registrations and click on New Registration
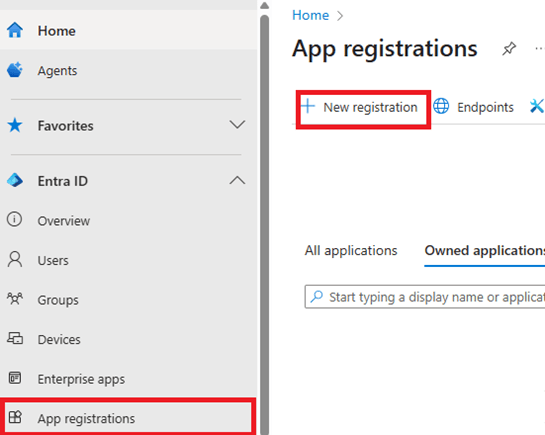
- In the Register an application page, enter your application’s registration information
- In the Name section, enter a name of your choice
- Select the ‘Accounts in any organizational directory’ option
- Set the Redirect URI to https://businesscentral.dynamics.com/OAuthLanding.htm
- Click on Register to create the application
- Click on Certificates & Secrets, select new client secret and set the desired expiration date.
***Keep the Value of the Client Secret saved. This value will NOT be shown again, and a new secret will need to be created.***
- Go to API permissions and add the following permissions:
- Business Central – User_Impersonation (Delegated Permission)
- Business Central – Financials.ReadWrite.All (Delegated Permission)
- Microsoft Graph – Files.ReadAll (Delegated Permission)
- Microsoft Graph – Files.ReadWrite (Delegated Permission)
- Microsoft Graph – Files.ReadWrite.All(Delegated Permission)
- Microsoft Graph – Sites.Read.All (Application Permission)
- Microsoft Graph – Sites.ReadWrite.All (Application Permission)
- Microsoft Graph – User.Read (Delegated Permission)
- SharePoint – Sites.ReadAll (Application)
- SharePoint – Sites.ReadWrite.All (Application)
- SharePoint – Sites.Selected (Application)
- SharePoint – Sites.Search.All (Delegated)
The following information will be needed for the next step
- Client ID
- Tenant ID
- Secret Value from step 4)
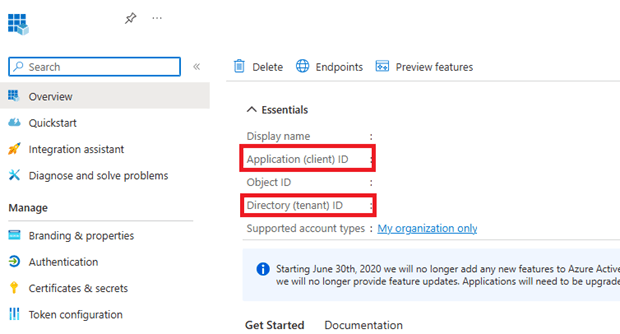
Connect the App Registration to Business Central
- In Business Central, go to Microsoft Entra Applications and select +New
- Enter the Client ID and give it a description and set the State to Enabled.
- Add Permission Set D365 BUS FULL ACCESS
- Select Grant Consent.
Verify HttpClient Request enabled
- Open the Extension Management page
- Open the SharePoint Connector app page
- Enable the Allow HttpClient Request checkbox
Connect the SharePoint to Business Central
Assign User Permission Set
- Search and enter “User” and click on the related link to open the Users list.
- On the Users list, select users that will require permissions to the Installment Payment Terms app.
- On each of the selected User Cards, go to the User Permission Sets tab, add the necessary permission sets based on the role of the user:
- APESHAREPOINTPERM – Assign this to users that will be using this app in the production environment.